- Image Quality - Due to the larger size of image sensors in DSLRs which allows for larger pixel sizes - DSLRs are generally able to be used at a faster ISO which will lead to faster shutter speeds and less grain (ie shoot at 1600 ISO on most DSLRs will have less noise than shooting at 1600 on a Point and Shoot). DSLRs also have built in noise-reduction when genearating JPG images which also helps cut down on noise.
- Adaptability - DSLR’s ability to change lenses opens up a world of possibilities for photographers. While my point and shoot has a nice little 3x Optical Zoom (and many these days have longer ones) my DSLR can be fitted with many high quality lenses ranging from wide angle to super long focal lengths depending upon what I’m photographing (and of course my budget). Add to this a large range of other accessories (flashes, filters etc) and a DSLR can be adapted to many different situations. It should be noted that when it comes to lenses that the diversity in quality of lenses is great. Image quality is impacted greatly by the quality of the lens you use.
- Speed - DSLR’s are generally pretty fast pieces of machinery when it comes to things like start up, focussing and shutter lag.
- Optical Viewfinder - due to the reflex mirror DSLR’s are very much a what you see is what you get operation.
- Large ISO range - this varies between cameras but generally DSLRs offer a wide array of ISO settings which lends itself to their flexibility in shooting in different conditions.
- Manual Controls - while many point and shoots come with the ability to shoot in manual mode, a DSLR is designed in such a way that it is assumed that the photographer using it will want to control their own settings. While they do come with good auto modes the manual controls are generally built in in such a way that they are at the photographers finger tips as they are shooting.
- Retaining Value - some argue that a DSLR will hold it’s value longer than a point and shoot. There is probably some truth in this. DSLR models do not get updated quite as often as point and shoot models (which can be updated twice a year at times). The other factor in favor of DSLRs is that the lenses you buy for them are compatible with other camera bodies if you do choose to upgrade later on (as long as you stay with your brand). This means your investment in lenses is not a waste over the years.
- Depth of Field - one of the things I love about my DSLR is the versatility that it gives me in many areas, especially depth of field. I guess this is really an extension of it’s manual controls and ability to use a variety of lenses but a DSLR can give you depth of field that puts everything from forground to background in focus through to nice blurry backgrounds.
- Quality Optics - I hesitate to add this point as there is a large degree of difference in quality between DSLR lenses but in general the lenses that you’ll find on a DSLR are superior to a point and shoot camera. DSLR lenses are larger (more glass can add to the quality) and many of them have many hours of time put into their manufacture (especially when you get into higher end lenses). I strongly advice DSLR buyers to buy the best quality lenses that they can afford. It it’s the difference between a high end lens on a medium range camera or a medium range lens on a high end camera I’d go for quality lenses every time as they add so much to photos.
Reasons to Upgrade to a DSLR Camera
Your Guide to Buying Old Film Cameras
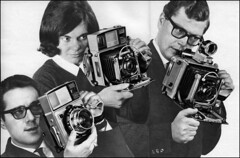
With the boom in digital cameras, used film equipment has been dropping in price and increasing in availability. Many people switch over to digital and decide to get rid of their old film stuff that they’ll probably never use again. This is good news for anybody wanting to get into film — cameras and lenses are insanely cheap (though, not the ones shown in this first photo!).
The cheap old film cameras are fun to use and great to experiment with. If you currently use a digital camera with all the bells and whistles, I’d suggest looking into a fully manual film camera from the 50’s, 60’s, or 70’s. There’s a huge selection of these cameras out there, and most of them are still in great working condition.
Here are some things to think about when looking for a new used camera. And for additional reading on the topic, check out Antonio Marques’ 5 Tips for Acquiring Old Cameras.
FIGURING OUT WHAT YOU WANT
Before you start looking for that old film camera, you should probably have an idea of what you’re looking for. There are so many cameras out there, and you could end up wandering aimlessly if you don’t have any notion of what you’re after. Here are three ways that you can use to help you define what you’re looking for.
One way to start refining your selection is to choose a type of camera. Maybe you want an SLR, or a rangefinder, or a TLR, or maybe a box camera. Find something that interests you and meets your needs. Be aware of camera types that require removable lenses, and be aware of the type of film they use. Some film formats are no longer offered, extremely hard to find, or very expensive.
Another way to narrow your search is by selecting a film format. Be sure you choose a film that you can actually buy or one that can be re-spooled from a standard film. You’ll have a wide selection of cameras if you stick with the 135 format, or 35mm film. But maybe you want to jump into medium format and find something that takes the common 120 format. If you want to know what’s readily available, visit your local camera shop or film store and see what they have.
And yet another method of refining your selection is by brand, or camera manufacturer. If you’re a brand loyalist like me (I love Minoltas), you’ll limit your searches and avoid comparing across brands. But beware, there are a ton of old camera manufacturers out there, so this may not be the best method of selection unless you feel very strongly about one in particular.
Oh, and one last thing… figure out what you’re willing to pay for the camera BEFORE you start looking at them. If you want to keep it under $50, keep it under $50. Going into a camera purchase without a budget is a bad idea no matter what kind of camera you’re buying.
DOING YOUR RESEARCH
Once you’ve figured out your direction, start looking around the web and do some research. Wikipedia and Camerapedia are good places to do general research on cameras. Look around on the sites that sell the cameras and get a feel for the price and condition of the cameras. During this process, you may end up selecting a particular model that you’re interested in, or you might even change your mind from your original intentions.
Search around for reviews, follow threads in forums, and basically dig up anything you can on your camera. The more you know about it, the better you’ll be able to interact with sellers. If you go into a camera purchase not knowing the basics of how it works or the features it has, you won’t know what to ask or what to look for.
THINGS TO WATCH OUT FOR
Different cameras will have different things to watch out for, but some things are similar across all cameras. I’m talking about spotting problems and avoiding bad equipment and sellers. Ultimately, what you’re after is a working camera at a fair price. Here are some things to look out for while scoping your equipment.

Watch out for prices out of the ordinary. You ought to have a feel for the going price on your camera — if you see one that’s priced too high, you might want to keep looking. Likewise, if you see something that’s listed way too low, there’s a good chance that the seller isn’t trustworthy or there’s something wrong with the camera.
Make sure everything is in working order. Some sellers don’t know the camera as well as they should — I recently bought a rangefinder “in working condition” and it showed up with a broken rangefinder mechanism! That sort of thing is kind of important. You’ll also want to make sure that things like the shutter, aperture blades, and film winder are working properly. Try to get a feel for the condition of the glass, and ask about scratches, dust, and fungus. Old camera bodies are pretty tough and scratches won’t do any harm, but watch out for cameras that are terribly beat up.
When was the camera last used? If it was recent and the seller is stating that it’s in working condition, then it’s likely that the camera will be fine. If the camera hasn’t been used in decades or if the seller is selling for a friend or relative, I’d be cautious. Old cameras will keep working for quite a while as long as they’re maintained and used often. If they sit in the closet for too long, things will start to rust and stick.
Cameras are sold for parts. Make sure you read the description for the camera you’re buying — some cameras are sold with the statement that they do not work and they could be used for repair or replacement parts. Don’t assume that all cameras for sale are in working order.
9 Reason to mannually focusing
Most Digital (and film) cameras today offer a nice feature called Manual Focus. This has not always been the case. The older more experienced folks remember that in the good old film days there was a big excitement when auto focus was introduced as a new feature.
There are many reasons to use Auto Focus - it is fast, accurate, and let you, the photographer concentrate on composition, lighting, framing and other technical and artistic factor of your picture.
However, there are still many situations when Manual focus can give better results than auto focus. [image cc by dalantech]
1. Macro
 When taking a macro picture the lens is usually very close to the subject. In some cases less then an Inch. Depth of Field (DOF) can be as shallow as two or three millimeters. The Auto-focus mechanism can not always detect what is most important to you in a macro shot - if it is not the center, you are better off making the decision yourself.
This is true event if you go to your highest possible depth of field, say f/22 or f/32.one way of dealing with the needed accuracy is to use special railing that make it easy to move the camera one or two milliliters forward or backwards. [image CC by markop]
2. Action
 The more expensive your camera body is the faster is the AF sensor it has. If you have a fast lens, your autofocus will be even faster. But even the fastest focus engine can not always compete with fast action shots.
Whether you are shooting your kid on a water slide, or a fast formula one race, if you know when the subject will be at the critical moment, set your focus there in advance and keep in on manual. When the subject enters the frame is positioned right, click the shutter release. [image CC by kiwêhowin]
3. Old lenses
 Sometime auto focus is not really an option at all. if you want to benefit some of the fine old lenses, you may find that they do not have auto focus capability at all or that they are not compatible with your SLR autofocus system.
For example, if you want to use the razor Nikkor 28mm f/2.8 lens you have no choice - you must go manual.
Ken Rockwell has a great compatibility chart for Nikon (and Nikonians have one too). It is easier for Canon users, any non EOS lens will not work with any new EOS camera - AF or no AF. [image cc by redandwhite]
4. Low light
 It is hard for the autofocus sensor to focus in low light. Even fast lenses with wide apertures can have a hard time in a dark room like a church or a cave.
If you shoot still life, you can use the auto assist bean, it is a beam that throes some light in front of the lens and helps the auto focus sensor. If you're photographing people, it can be harder - using the AF assist beam can be annoying to some, break the feel of the moment it draws attention to you and ruin a shot. [image cc by nickwheeleroz]
5. Blurring a shot
 Sometimes you want to have some artistic control over in a particular picture and create a blur effect for artistic reasons.
You may want to have the entire picture out of focus or have a negligible, almost off the frame object, in focus. In either case, moat auto focus mechanism will not allow you to perform the first and will give you a hard time achieving the second.
DPS has a nice tutorial on taking out of focus images. [image CC by kubina]
6. Going Hyper Focal
 Have you ever wondered how the take those stunning nature shots that have both the nice rocks at the close front and the water fall at the far back sharp. Hyper Focal Distance is a photography term used to note the point that if you set your focus to it, you will gain the most Depth of Field front to back.
Jeff from has a great Hyper Focal Distance tutorial, which is recommended both for the technical enthusiastic and starting nature photographer.
Alex Wise (site) is one of my favorite photographers who makes it a habit to post lots of vertical hyper focal landscape images. [image CC by night86mare]
7. Shooting Fireworks / Stars
 In light of the fact that we have just celebrated the forth of July we had a ton of great shooting fireworks tutorials (those are six of my favs). What's common to taking pictures of both fireworks and stars it that you want to set your camera to manual focus and focus on infinity (that's the weird "8" that's laying on the side). Honest! Look at all those tutorials - they all say it. [image cc by sacharules]
8. Panning
 When taking a panning picture, you have to follow a moving subject. One way to deal with the movement is to set your focus mode to AF-C (continuous auto focus), another is to rapidly half-press the shutter release.
I would like to suggest a third way. If you know the route of your subject, you can set the focus to a pre-known location that your subject will go through. Now you know that your subject will be focused in the critical section of the pan. [image cc by mactiste]
9. Lens Babies
 Lensbabies are lots of fun. they give a nice shallow focus effect.
Lensbabies do that by having a flexible mount which imitates tilt/shift lens.
Just like old lenses, Lensbabies are manual focus only. On the other hand, this is just what you'd expect from a lens baby - you make the artistic call, including setting the focus point.
from : www.diyphotography.net
How To Create high-contrast Black White images
n Photoshop CS3, making black and white photos is easier than ever. This tutorial is not limited to converting color photos to monochrome but how to make them pop by adding contrast and a vignette.
(Lisa's note: It's always best to shoot in color and convert to BW during post-processing. You tend to lose detail when shooting BW straight out of the camera, and the images most often end up looking soupy.)

Open your photo in Photoshop and press CTRL-SHIFT-ALT-B to enter the Black and White conversion window. You can also select Image from the main menu and go into Adjustments. Once the window opens, you are given 6 colors that will affect how your photo is converted. There is no fixed rule on what amounts you place in the different colors since it depends on your picture. For the photo that I used as an example, I selected 103% for Red to lighten the man’s face. I lessened the Yellows and Greens to darken the background to make the subject more prominent in the photo.


If you are not that familiar with black and white conversions, just move the color sliders left and right to see how each color affects your photo.
Next, we will apply Curves to the photo to increase contrast. This is a very important step for me since I find low contrast mono photos soupy. If you want your photo to have that dreamy effect then you can skip this step but for the most part, good black and white photos should have all the gradations from almost white to almost black. Press CTRL-M to bring out the Curves dialog box. For this photo I used the setting in the photo below.

Again, there is no hard rule in applying Curves since it will depend on the photo. Just make sure that you do not clip your highlights and lose detail on your shadow areas.
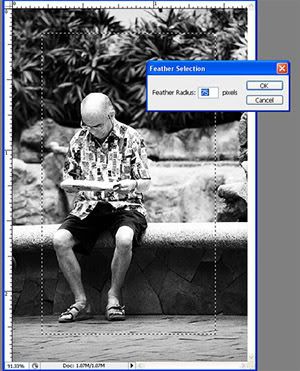
Next, we’re going to add a vignette to the photo to make the subject pop out more. Select the Rectangular Marquee tool by pressing M. Make a selection on your photo about 1 inch away from the edges. Right click on the photo and select Feather. For a 500x750 pixel photo, I select a value of 75 for Feather. This will make the edge of the vignette softer and more natural.
Right click on the photo again and pick Select Inverse from the pop-up menu. You will see that the selection will then highlight the borders of your photo. Right click again on the photo and select Layer via Copy. This will save the selection as another Layer. On the layer menu, change the blending mode to Multiply on your new layer. This will darken the edge of your photo completing the vignette effect. If the effect is too dark then you can lower the layers Opacity to lessen the effect. Click on Image on the main menu and select Flatten Image to merge your two layers.

Adding a vignette will sometimes darken the whole photo including the area that was not selected. If this happens, simply pull up the Curves dialog again by pressing CTRL-M and just pull up the midtones until the photo looks brighter.

The first photo below is the black and white conversion without the contrast adjustment and vignette. The second photo is the black and white conversion with both the contrast adjustment and the vignette. This is all, of course, subject to one's taste and aesthetics.

from: Beyondmegapixel.com
Camera Exposure Modes
Shooting in manual full mode will always be the best way to get the most creative shot since you are in control of everything. But there are instances when you just do not have the time to fiddle around with the proper combination of ISO, aperture and shutter speed. On these occasions, you have to rely on your camera’s metering system to get you the correct exposure.
All light meters, including in-camera meters, are designed to give you a reading that will make the subject have the same tone as a 15% gray card. Manufacturers designed meters to give you an average reading on an average or neutral subject. This is very important to keep in mind when relying on your camera’s different metering modes.
There are also different types of exposure modes in modern day DSLRs that are called different names by different brands. For the purpose of this article, we will be concentrating on the three main exposure modes: evaluative/matrix, center-weighted, and spot metering.
EVALUATIVE / MATRIX MODE
Before the advent of digital cameras, pro photographers relied on light meters to get a scene’s proper exposure. What they do is meter for the scene’s highlights, midtones and shadows and get the average of the different readings. That’s a lot of work to get just one shot.
Your camera’s evaluative (Canon) or matrix (Nikon) mode does that same thing. It samples different areas of the scene and arrives at the average reading. The total number of areas or zones that are metered is dependent on how advanced your camera is. The Canon 400D samples 35 zones in a scene while the 1Ds Mark III samples 63 zones. It goes without saying that the more zones sampled, the more accurate the exposure will be.
CENTER-WEIGHTED
Center-weighted also samples the entire scene but the difference is that it puts more importance to the zones near the center of the scene. On most brands, 75% of the total exposure is taken from the center of the frame and 25% to the outer parts.

This exposure mode is best used for portraits where the face of the subject is occupies a large part of the viewfinder. This is because the average skin tone is pretty close to a 15% gray card which should get you a pretty precise reading.
SPOT METER
This setting gives you the most precise control among the different exposure modes. In this mode, the camera only meters around 3% of the entire scene. The reading is usually taken at the center focus point but other cameras give you the option to change this.
This mode is best for scenes that have very bright and dark areas which can easily fool your camera. What you do is look for an area that is somewhere in the middle of the brightest and darkest parts and use the spot metering mode to get a reading off that. The spot meter is also useful in shooting silhouettes. You simply meter for the bright background then everything that is darker than that will automatically turn into silhouettes.
Subscribe to:
Posts (Atom)