n Photoshop CS3, making black and white photos is easier than ever. This tutorial is not limited to converting color photos to monochrome but how to make them pop by adding contrast and a vignette.
(Lisa's note: It's always best to shoot in color and convert to BW during post-processing. You tend to lose detail when shooting BW straight out of the camera, and the images most often end up looking soupy.)

Open your photo in Photoshop and press CTRL-SHIFT-ALT-B to enter the Black and White conversion window. You can also select Image from the main menu and go into Adjustments. Once the window opens, you are given 6 colors that will affect how your photo is converted. There is no fixed rule on what amounts you place in the different colors since it depends on your picture. For the photo that I used as an example, I selected 103% for Red to lighten the man’s face. I lessened the Yellows and Greens to darken the background to make the subject more prominent in the photo.

If you are not that familiar with black and white conversions, just move the color sliders left and right to see how each color affects your photo.
Next, we will apply Curves to the photo to increase contrast. This is a very important step for me since I find low contrast mono photos soupy. If you want your photo to have that dreamy effect then you can skip this step but for the most part, good black and white photos should have all the gradations from almost white to almost black. Press CTRL-M to bring out the Curves dialog box. For this photo I used the setting in the photo below.

Again, there is no hard rule in applying Curves since it will depend on the photo. Just make sure that you do not clip your highlights and lose detail on your shadow areas.
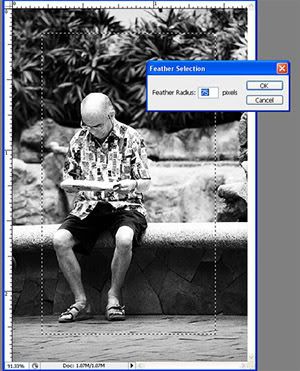
Next, we’re going to add a vignette to the photo to make the subject pop out more. Select the Rectangular Marquee tool by pressing M. Make a selection on your photo about 1 inch away from the edges. Right click on the photo and select Feather. For a 500x750 pixel photo, I select a value of 75 for Feather. This will make the edge of the vignette softer and more natural.
Right click on the photo again and pick Select Inverse from the pop-up menu. You will see that the selection will then highlight the borders of your photo. Right click again on the photo and select Layer via Copy. This will save the selection as another Layer. On the layer menu, change the blending mode to Multiply on your new layer. This will darken the edge of your photo completing the vignette effect. If the effect is too dark then you can lower the layers Opacity to lessen the effect. Click on Image on the main menu and select Flatten Image to merge your two layers.

Adding a vignette will sometimes darken the whole photo including the area that was not selected. If this happens, simply pull up the Curves dialog again by pressing CTRL-M and just pull up the midtones until the photo looks brighter.

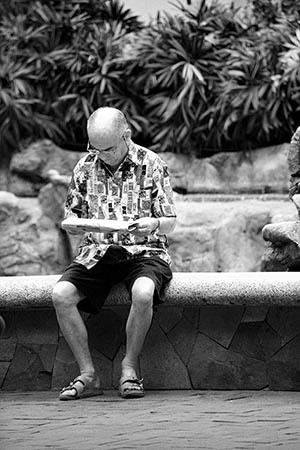
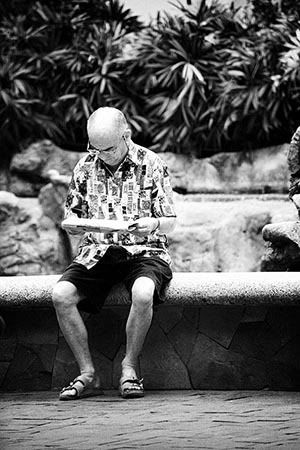
The first photo below is the black and white conversion without the contrast adjustment and vignette. The second photo is the black and white conversion with both the contrast adjustment and the vignette. This is all, of course, subject to one's taste and aesthetics.
from: Beyondmegapixel.com
0 komentar:
Post a Comment